
 How to Fix an Internal Server Error in WordPress
Anyone that has managed or worked on a WordPress website has or will eventually run into the Internal Server Error (HTTP Error 500). The problem with this error is the lack of diagnostic information provided and the common misdirection in troubleshooting it causes whilst attempting to fix it. In fact, an Internal Server Error is rarely an actual server error and typically a programming error with a syntax-based solution. In this article, we will provide helpful information to shed light on solutions for common causes of an Internal Server Error in WordPress to help you avoid chasing your own tail.
So, What Exactly is an Internal Server Error in WordPress?
If you have spent some time on google or technical documentation you will have discovered the web definition of the 500 Internal Server error and probably ended up with more questions than when you started. In a nutshell, there is no clear indication as to the root cause of this specific error giving you no idea where to even begin.
Upon inspection of HTTP specifications, you will find that an internal server error means the following:
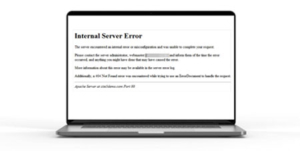
The server encountered an unexpected condition that prevented it from fulfilling the request.
The only conclusion one can arrive at is that an error caused by an operation broke your website. As it relates to WordPress, you can conclude that a specific line of code or programming in your theme or plug-in caused your website to crash. Despite the ambiguous nature of this error there is a clear set of procedures that can help you get your site back up and running in short order.
Again, there is most likely nothing wrong with your web server itself – it’s simply encountered code that is causing it to crash. So, to figure out what’s going on, you’re going to need to do some troubleshooting with a bit of trial and error. It’s going to require a methodical approach whereby you test and refine your solution based on information extrapolated from your attempts.

How to Fix WordPress 500 Internal Server Error
In order to fix an Internal Server Error on a WordPress website you must methodically execute a troubleshooting procedure in chronological order. It’s important to implement each step as outlined skipping steps as recommended by our outline. Lastly, it should go without saying but for the purposes of being thorough we would like to remind you to make a backup prior to beginning this process as a part of the procedure. In the event that you do not have access to your dashboard your web host should provide the necessary tools to create a backup and we highly-encourage you to do so. If you feel this is all over your head feel free to contact us for hourly support and we should be able to get your site back up and running in no time.
WordPress Internal Server Error Troubleshooting Summary
1. ENABLE DEBUGGING
Anytime you begin to experience issues with your WordPress website you should immediately enable debugging. While it may not resolve your issue, it will certainly glean important insight, save you time, and point you in the right direction.
- Enabling debugging for WordPress is pretty straight forward if your familiar with editing files on a web server. Here’s how to do it:
- Navigate to your site root directory and edit
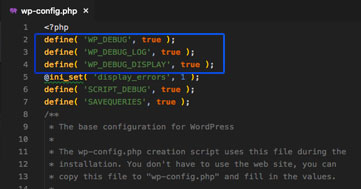
wp-config.php - Once you’ve accessed this file and are editing, look for
WP_DEBUG - Upon identifying
WP_DEBUGsimply edit the value and set it to “true” - If you don’t see it within the file, you’ll need to generate it yourself (it should look like the code below)
- Upon completion, reload your website
- In a best case scenario, the internal server will be replaced with an informative description of the current problem with your website
- If the error seems to be located within a plugin folder simply disable that plugin and the error should go away
- If debugging hasn’t given you additional insight, best practice dictates leaving it on until the issue is resolved
define( "WP_DEBUG", true );
Important Note: Upon completion of this procedure make sure to reset your WP_DEBUG value back to false so that it isn’t accidentally left in debug mode. By default, debug notification messages will be displayed on your entire site, which is why its so important to deactivate upon completion (not to mention the potential security risk).
2. DASHBOARD TEST
The next part of this procedure is to determine whether or not you can access the WordPress backend dashboard. To check this simply visit your WordPress website’s admin URL (i.e. https://yoursite.com/wp-admin) and if the page loads and you see the login page attempt to log in. If you are able to login successfully you can pretty safely conclude the issue lies within one of your plugins or your theme. If the dashboard loads up without any issues proceed to the next step but if it doesn’t go ahead and skip to step five.
3. DISABLE PLUG-INS
In this step we’re going to test and determine if the issues is being caused by a WordPress plugin. Disabling plugins allows you to determine how your website functions without the influence of that particular plugin. Deactivating a plugin does not delete a plugin or remove any data (important data is stored safely in your database) but what it does do is disable the plugin’s code from running which can potentially fix an issue that is causing a website to crash and triggering an Internal Server Error.
Plugins are a great way to expand the functionality of a WordPress website however do to the fact that plugins are generated by different programmers they can often conflict with other code running on a website. For this reason, it’s important to check and see if there is a conflict occurring that is triggering an Internal Server Error.
Assuming you are able to login to your WordPress dashboard, disable plugins by following these steps:
- Navigate to the Plugins section in your WordPress dashboard.
- Use the checkbox to select all plugins.
- Use the Bulk actions drop-down to Deactivate them.
- Select Apply.
In the event that you are unable to deactivate plugins via the dashboard you can also deactivate them via FTP by following these steps below:
- Connect to your WordPress site’s server via FTP using an FTP Client like FileZilla.
- Navigate to the wp-content folder in your root directory.
- Rename the plugins folder to plugins-deactivated or download the plugins folder and then remove them.
Once you have disabled your plugins check your website and if it’s still giving you an Internal Server Error proceed to step four. However if your site is now up and running, the next action to take is determining which plugin specifically is causing the problem.
To Identify a Problematic Plugin reactivate your plugins one by one and reload your website after activating each one until you find which plugin triggers the Internal Server Error. Upon identifying the culprit, you have a couple options, you can attempt to update the plugin/reinstall it or you can simply remove it if it isn’t essential. If it is an essential critical plugin, you should notify the plugin author and look for a better alternative solution in the mean time.
Important Note: In the event that you have deactivated plugins via FTP, you will need to ensure plugin files are moved back into your WordPress plugins folder in order to reactivate them. If you believe a plugin is made by a reliable author keep in mind that, in rare cases, the version of PHP on a server can impact the way plugins or themes behave. Make sure to take a look at step eight for more information on PHP Version issues and how they can impact WordPress websites.
4. DISABLE THEME
Once you have tested your WordPress plugins the next step in the troubleshooting process involves troubleshooting your theme and the various files that work in symphony to generate the look and feel of your website. The quickest way to troubleshoot your theme to verify if its causing issues is by simply deactivating it and activating a default WordPress theme like Twenty Twenty.
Assuming you’re able to access the WordPress dashboard, activate a default WordPress theme by navigating to Appearance -> Themes. In the event that you have removed the default WordPress theme don’t worry, just select “Add New Theme,” and search for it in the WordPress repository or navigate to WordPress.org, search for it, download it, upload it in the themes section of the WordPress dashboard and activate it.
If you are unable to upload or change themes via the dashboard access the site by way of FTP and complete the following instructions:
- Using an FTP client, connect to your WordPress site (you will need to authenticate using log in credentials)
- Assuming you’re in the root directory, navigate to the wp-content/themes folder.
- Missing the Default Twenty Twenty WordPress Theme? No worries! Simply reinstall it. To obtain a copy of a default WordPress theme your going to want to navigate to WordPress.org and download the Twenty Twenty WordPress theme. To install a theme via the dashboard navigate to Appearance -> Themes and upload the theme zip file. To install the theme via FTP your going to want to extract the theme files from the the archived zip format and upload the complete folder to the wp-contents/themes folder.
- If you are unable to activate the default theme and deactivate the current theme in question you can manually change the active theme via FTP. Simply rename the folder of your currently active theme to [theme-name]-deactivated. When you rename the folder accordingly, WordPress will automatically fall back and implement the default WordPress theme (as long as the default theme is installed).
In the event that switching to the default WordPress theme solves your Internal Server Error problem, you can now re-enable all plugins and focus on finding the issue in the theme’s code. At this point you have a few options to help resolve the issue with this specific theme.
- Obtain a fresh copy of the theme in question (if the theme in question has been updated – this alone may fix your problem) and then proceed to reinstall the theme
- If reinstalling the theme is out of the question, you’re going to have to decide if you will troubleshoot the source code and/or activate a new theme while you determine a solution for the theme issue. Additionally, your going to want to contact the developer/author of the theme to communicate your issue and possibly work with the author to resolve the issue or simply communicate the fact that the theme needs to be updated.
- If you are using a custom theme you have developed you’re going to want to work with a developer to iron out these issues because these types of bugs can be very troublesome and difficult to troubleshoot (even for experienced developers).
Important Note: In rare circumstances, the PHP version utilized by your web server may cause issues with your theme that may send you chasing your own tail. To avoid wasting time check the documentation for your theme and ensure your web host is using the adequate version of PHP. Identifying issues caused by PHP can save you time and money – developers are expensive so you want to make sure you identify issues related to PHP sooner rather than later to avoid unnecessary development costs.
5. INCREASE MEMORY LIMIT
If you create a website that uses excessive programming or simply needs to be optimized it will reach a point where memory use is so high it causes your website to crash and result in an HTTP 500 Internal Server Error. Often times, this is the result of poor development or boggy coding in your theme or plugins. In most cases, the quick fix is to increase the memory limit but it may fix your site temporarily if at all and fail to address the underlying problem.
There are various ways to increase your memory limit but the quality of your web server will impact its limits and capabilities. Often times with cheaper web hosts increasing the memory limit is not possible or severely limited.
How To Increase WordPress Memory Limit
- Edit the wp-config.php file in site root directory
- Modify your PHP.ini or .USER.INI file (if you have access — you may not)
- Configure .htaccess file in root directory
Editing the files above will require a little development know-how however if you need detailed information on the procedure check out our article on Increasing WordPress Memory Limit. In a nutshell your going to need to connect to your web server via FTP or hosting file manager and adding or editing the respective code.
Code Needed to Increase WordPress Memory Limit
MODIFY WP-CONFIG.PHP
Add the following code snippet above the line that says /* That’s all, stop editing! Happy blogging. */:
define(‘WP_MEMORY_LIMIT’, ‘256M’);
EDIT PHP.ini OR .USER.ini
Find the line that says memory_limit = [number]M and increase the limit. Simply add the code in the following format:
memory_limit = 256M.
EDIT .HTACCESS
The .htaccess file is a configuration file used on servers running on the Web Apache Server Software. Simply add the following line:
php_value memory_limit 256M
STILL HAVING ISSUES? CALL US!
To increase the memory limit for WordPress simply call your hosting provider and let them know. As a rule of thumb, Managed WordPress Hosting is a service where your hosting provider manages technical aspects of your website like this saving you time and stress. If your tired of tinkering with HTML or programming for your website give us a call our service is professional, quick and cost-effective.
6. TROUBLESHOOT .HTACCESS
The .htaccess file is an Apache Server configuration file that allows you to configure advanced functionality. It allows you to do things like enabling GZIP Compression, configure maximum file upload size, manage 301 redirects, and various other website administration features. WordPress also references this file to manage permalinks, force SSL encryption, restrict access to specific files, and much more. Make sure to check out our article “The Power of .HTACCESS and How to Fully Harness it to Protect Your Website,” for more information on improving security and understanding the sensitive nature of editing this file.
Warning: Proceed with caution. Editing .htaccess is a feature best left to experienced developers because typos in this area can and will cause a 500 Internal Server Error on your WordPress website. In most cases, a problem with .htaccess will break your site in its entirety from front end to back end so be careful.
Troubleshooting .htaccess Involves a Few Steps as Follows:
- Connect to your server once again via FTP and locate the .htaccess file in your root directory
- Download and safeguard a copy of your .htaccess file for safety and security
- Once you have acquired a backup of .htaccess, delete the current copy of it on the server’s root directory
Upon completion, check to see if your website is working, if it is you can assume the issue resides in that .htaccess file. In many cases, your server will automatically generate an .htaccess file or uses default server settings. As long as there is no customized .htaccess rules/code you can easily recreate this file through WordPress by navigating to Settings -> Permalinks and selecting Save (no need to make any changes – simply click save).
If you discover custom edits in the downloaded copy of .htaccess you can troubleshoot the issue by implementing the code one line at a time until your site breaks (at which point you document and isolate the specific code). If everything goes well, you can update the rest of the code on your new .htaccess file and make sure to upload it or save it (if editing in a web browser server file manager).
At this point you have a couple options to fix the offending code:
- Scan the problematic line of code for issues like unnecessary text, unclosed quotes, or any other issue. Once completed, modify .htaccess and save it to your web server’s root directory.
- Remove the Problematic Code – Unless there is an important reason to keep the line simply remove it to get your site back up and running quickly. A crashed website is more problematic than a missing line of configuration in your .htaccess file.
- Research Online – Search online through forums and websites with key information about the problem like the line of code. There is a high chance someone has experienced the same or similar issue
- Lastly, you can use this .htaccess Syntax Checker to identify common errors and typos.
If your still having issues or you have questions about editing this configuration file feel free to contact us. We do provide phone technical support or shared screen support which allows us to help you resolve your issue.
7. RE-INSTALL WORDPRESS
In rare circumstances, you may experience issues displaying as an Internal Server Error due to corrupted WordPress system files. Although this may sound daunting its actually pretty easy to fix provided you know your way around by now. Corrupted files occur at times due to the dynamic nature of uploading files and their dependence on a strong internet connection. In any case, what your going to want to do is simply reinstall the WordPress core files by uploading them via an FTP Connection or web browser file manager.
Ready to reinstall your WordPress core files? Proceed as follows:
- Download the latest copy of WordPress from WordPress.org.
- Extract the ZIP file.
- Remove the wp-content folder and the wp-config-sample.php file. Ensure there isn’t a wp-config.php file and delete it if there is (it usually isn’t in there but we’re going to use the current wp-config.php in the root directory of your server for a smoother experience.
- Authenticate & Connect to your server via FTP using an FTP Client like FileZilla.
- Upload the remaining files and folders to the root folder overwriting all files.
If you find this process overwhelming or simply don’t want to deal with it feel free to contact us. We help website owners on a per diem basis and help to streamline the web design process so you can focus on the big picture. Give us a call or send us an email if your interested.
8. CHECK PHP VERSION
In many cases, older PHP versions don’t commonly cause an internal server. However, PHP is an essential part of the infrastructure that makes up your WordPress website so your going to want to have the newest version possible for both convenience, performance and security reasons. If your PHP version is out of date, updating PHP to the newest version possible may resolve various issues including an Internal Server Error (which I have seen as the issue in my experience). One of the key issues with the newest PHP 7 is the fact that it has deprecated some previous features found in older PHP which cause issues with older programming referencing these specific features. For this reason, you want to use the latest version of plugins and themes whenever possible and check documentation for PHP Version requirements.
If your unsure of your PHP version simply ask your host or login to your hosting account scan your services to determine your PHP version. As of September 2020, PHP 5.6 no longer receives updates (or even basic security support) – don’t accept it if your host is running it on your site to avoid issues. You should at least have some flavor of PHP 7 running. Ideally, you’ll want to be on PHP 7.3+ since PHP 7.0-7.2 will stop receiving security updates at the end of 2020.
If your still having issues feel free to contact us for additional support. We can schedule a zoom call or access your site remotely and perform updates for you when needed.
SITE STILL DOWN? TEST FOR COMPOUND DATA ISSUES
Due to the dynamic nature of websites it is possible for your site to have multiple root causes to an Internal Server Error. For example, you may have to disable plugins and remove your .htaccess for to fix a compound problem on your website. Due to the fact that some plugins edit .htaccess you may want to consider this as part of your troubleshooting process.
If you’ve performed the procedure we have outlined and the issue has still not been resolved your going to want to perform the procedure again taking careful attention to ensure every step is followed as outlined. As you perform the process a second time don’t undo any changes as you go down the list to address issues caused by dynamic compound problems. Through a bit of trial and error you should be able to identify a solution for your Internal Server Error issue.
If you are frustrated and would rather let us handle this problem simply contact us.
Frustrated By Dealing With Errors? Try 960 Managed WordPress
As you may have experienced, there is quite a bit of information to retain and consider to effectively resolve this issue. Troubleshooting WordPress in and of itself is a difficult task even for seasoned veterans but many of our clients have been independent professionals, teams or business owners that we’re simply tired of dealing with the technical jargon and litany of updates that at times must be carefully implemented. If you don’t want to deal with these issues yourself and don’t mind paying for a better experience, moving your site to 960 Managed Hosting could be a huge benefit that will save you time and money in the long run.
We have many clients on our managed hosting platform with websites that we proactively monitor and update and eliminate most issues so clients can focus on the important aspect of their website (the content). In some cases, we even manage informational updates for clients however we create a relationship based on the needs of our clients. Our goal is to deliver an experience that helps our clients thrive and get the most from their website.
The downside to managed WordPress is that it costs a little more than basic generic hosting but our clients have constantly reminded us that its worth the difference due to the convenience and much smoother experience. If you value peace of mind and like being able to call your web designer without being placed on hold you may want to consider our managed hosting. Should your website experience downtime or an Internal Server Error we will get your site back up in as little as 24 hours or less from the moment we discover it.
